GTA 5 Speedrun: Can You Beat the Game When Everything Launches Every 10 Seconds?

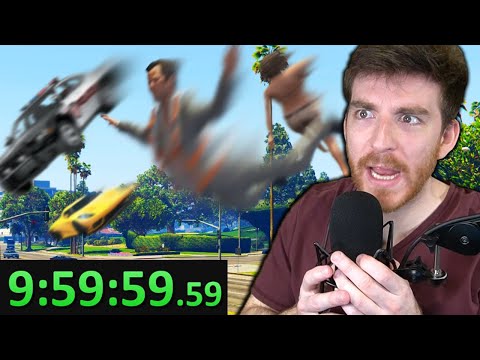
What happens when a Grand Theft Auto V speedrun goes completely off the rails? Imagine trying to set a new World Record (WR) in GTA 5, but every single object, NPC, and vehicle in the game has a mind of its own, violently launching into the air every ten seconds. Sounds chaotic? That's exactly what this legendary stream attempt was all about. If you're here looking for the ultimate challenge, a break from traditional speedrunning, or just a good laugh, you've come to the right place. This isn't your average GTA 5 playthrough; this is a test of sanity, reflexes, and sheer luck.

What is This Crazy Challenge?

This wasn't just any speedrun attempt. The premise was simple yet utterly insane: what if the core physics engine of Grand Theft Auto V was modified to launch every single entity – from cars and pedestrians to props and even animals – into the air at random intervals, specifically every ten seconds? The goal, as always in a speedrun, was to complete the game as fast as possible. However, the "launched" modifier turned what should be a meticulously planned race against time into a hilarious, unpredictable disaster.

This experiment pushed the boundaries of what a typical GTA 5 speedrunning attempt looks like. It’s a testament to how mods and community-driven challenges can breathe new life into even the most established games and speedrunning categories.

The Chaos Unfolds: A Speedrun Gone Wild

Streaming live on Twitch, DougDoug (who often tackles bizarre gaming challenges) presented this mind-bending scenario to his audience. The initial moments were a mix of trepidation and amusement. As the timer hit the ten-second mark for the first time, the screen erupted. Cars spun into the sky, pedestrians became airborne projectiles, and the carefully crafted routes of a typical gamer were instantly obliterated.

Trying to navigate the streets of Los Santos became an exercise in futility. A police car might be your target for a mission, but in this world, it could be at the bottom of the ocean or halfway to the moon at any given moment. The objective to finish the game felt less like a planned execution and more like surviving an apocalyptic event.

"It's less about precise inputs and more about not getting pancaked by a flying police cruiser."

Each attempt was a fresh descent into madness. Strategies had to be thrown out the window as soon as they were conceived. The very act of driving from point A to point B was a monumental task, fraught with peril from unexpected aerial assaults of game assets.

The Glitch That Launched a Thousand Ships

While the core premise was a mod, the sheer scale of the chaos suggested some underlying physics engine quirks were being exploited or amplified. The term "glitch" might be an oversimplification, but the effect was undeniably game-breaking in the most entertaining way. Imagine trying to execute a critical mission objective, only for the target vehicle to be yeeted across the map by an invisible force.

This wasn't about finding tiny PB-shaving glitches or sequence breaks that are common in the competitive speedrunning scene. This was about a fundamental alteration of the game's reality. It turns out that when you tell the game engine to launch *everything*, it doesn't discriminate. It’s a glorious, destructive embrace of emergent gameplay.

Strategies and Survival in a World of Flying Debris

Traditional GTA 5 speedrunning relies on executing precise routes, mastering vehicle handling, and exploiting minor glitches. In this modified world, "strats" took on a new meaning. Survival became the primary objective, with speed being a secondary, almost laughable, consideration.

Players had to anticipate the launches, using the brief moments of relative calm to move, or even using the airborne objects to their advantage. Could a launched car be used as a makeshift ramp? Could an airborne NPC accidentally clear a path? The possibilities, though unlikely, were part of the chaotic fun.

The closest analogy might be trying to complete a puzzle where the pieces constantly explode off the board.

This challenge highlights the adaptability of the gaming community. Faced with seemingly impossible odds, players try to find *any* edge, even if it means predicting the trajectory of a flying taxi. It’s a pure test of quick thinking and reaction time, far removed from the rote memorization of typical online gaming challenges.

When RNG is King: Luck vs. Skill

In many speedrun categories, skill and practice are paramount. You can learn every trick, every optimal route, and shave milliseconds off your time through sheer dedication. However, in a scenario where the game itself is actively trying to thwart you with random physics anomalies, Random Number Generation (RNG) plays a colossal role.

The timing and direction of each launch are unpredictable. One run might see a clear path forward, while the next could be instantly ended by a truck materializing mid-air and crashing down. This level of randomness makes achieving a personal best (PB) incredibly difficult and emphasizes the comedic aspect of the challenge rather than pure competitive performance. It's a reminder that sometimes, in gaming, you just need to get lucky.

The Community Reaction and Live Audience

The beauty of streaming such an event lies in the immediate feedback from the audience. Viewers on Twitch were treated to a spectacle of fails, near-misses, and moments of sheer absurdity. Chat channels exploded with reactions, from laughter to expressions of disbelief.

This kind of content thrives on shared experience. Viewers aren't just watching a game; they're witnessing a unique, often unrepeatable event unfold in real-time. The collaborative nature of Twitch, with chat interacting with the streamer, adds another layer of entertainment. It’s this shared immersion that makes live streaming so compelling for gamers worldwide.

"Watching this is more fun than playing it, and I mean that in the best way possible!" - A typical chat comment.

The success of such a stream also fuels further creativity within the community. It inspires others to come up with their own unique challenges and pushes the boundaries of what's possible within existing game engines, whether through legitimate mechanics or clever modding.

The Editing Magic by CyVoltage

While the live stream captured the raw chaos, the experience was elevated to another level thanks to the masterful editing by CyVoltage. Edited videos often distill the funniest, most spectacular, and most frustrating moments into a concise and highly entertaining package. This is crucial for sharing the highlights across platforms like YouTube and reaching a wider audience.

CyVoltage’s work, available on their YouTube channel, likely captures the best of the launches, the most improbable survival moments, and the overall comedic arc of the stream. For those who missed the live event or want to re-live the insanity, these edited versions are a must-watch. They transform a potentially hours-long, chaotic stream into a perfectly paced comedic masterpiece.

You can check out CyVoltage's channel here: https://www.youtube.com/c/CyVoltage. It’s a great example of how creators collaborate to amplify the impact of content within the gaming sphere.

Frequently Asked Questions

What game is this speedrun of?

This is a modified speedrun attempt of Grand Theft Auto V (GTA 5).

What makes this speedrun different?

The core difference is a modification that causes almost every in-game object, vehicle, and pedestrian to be violently launched into the air every 10 seconds, making traditional progression extremely difficult.

Was this a legitimate speedrun attempt for a World Record?

While the goal was to finish the game quickly, the extreme nature of the modification makes it more of a community challenge or a "fun" run rather than a competitive World Record attempt in a standard category.

Where can I watch the full stream or edited video?

The full stream recording is available on YouTube, and edited highlights are typically found on the creator's main YouTube channel or the editor's channel (CyVoltage).

Is this challenge playable by the average gamer?

While anyone can theoretically attempt it with the right setup, mastering the chaos requires significant practice, quick reflexes, and a high tolerance for unpredictable events. It's more about embracing the absurdity than achieving perfect execution.

This GTA 5 speedrun challenge, with its ever-present airborne chaos, is a perfect example of how the gaming community pushes boundaries and finds new ways to experience beloved titles. It blends the intensity of a speedrun with the unpredictable hilarity of a physics experiment gone wild. Whether you're a seasoned speedrunner looking for a laugh, a GTA 5 fan, or just someone who enjoys watching delightful chaos unfold, this content offers a unique and memorable experience.

What do you think of challenges like this? Have you ever encountered a game-breaking mod that led to hilarious situations? Let us know in the comments below! Join our Discord channel to share your thoughts and find other hardcore gamers.

```

Final Doom: Plutonia Experiment Nightmare! Speedrun Shatters Records in 34:28

Hey there, fellow Doom enthusiasts and speedrun fanatics! You've landed on GamingSpeedrun.com because you're hungry for that adrenaline rush, that perfect sequence of pixel-perfect movements and strategic monster management that defines the ultimate speedrun. Today, we're diving deep into the fiery depths of Final Doom: The Plutonia Experiment, specifically a jaw-dropping Nightmare! category run by the legendary Zero-Master that clocked in at an unbelievable 34 minutes and 28 seconds. Forget your casual playthroughs; this is high-octane gaming at its absolute finest.

Introduction: The Plutonia Nightmare Unveiled

When you think of speedrunning some of the hardest Doom WADs out there, Final Doom: The Plutonia Experiment on Nightmare! difficulty is often mentioned in hushed, fearful tones. It's a brutal test of skill, patience, and pure gaming grit. So, when Zero-Master dropped a new World Record (WR) of 34:28, it sent ripples through the community. This wasn't just a minor improvement; it was a massive leap forward, proving that even the most daunting challenges can be overcome with dedication and a mastery of the game's mechanics. This run is a masterclass in Doom speedrunning, showcasing incredible route optimization and flawless execution.

Run Details: The Anatomy of a Record

Let's break down the core stats of this incredible feat. This run was published on October 29, 2020, pushing the boundaries of what was thought possible for this notoriously difficult WAD.

  • Runner: Zero-Master
  • Date: 2020-10-29
  • IWAD: Plutonia.wad
  • Category: NM-Speed (Nightmare! Speedrun)
  • Map Progression: D2All (Maps 1-30)
  • Source Port: Crispy Doom v5.9.2
  • Total Time: 34:28

The improvement over the previous record, held by S6kana, was a staggering 3 minutes and 32 seconds. Considering the razor-thin margins in most speedruns, this is monumental. Even more impressively, it was nearly 10 minutes faster than Zero-Master's own previous best run. This speaks volumes about the dedication to route refinement and skill development.

Map-by-Map Breakdown: Strategies and Close Calls

What makes this run so fascinating are the specific strategies employed on each map and the moments where disaster could have struck. Zero-Master provides some insightful commentary on the challenges and triumphs within each level.

Map 01: A Welcoming Warm-up?

The opening map often sets the tone. For Plutonia, even Map 01 can be tricky on Nightmare!. Zero-Master notes a smart strat from S6kana: instead of dealing with a single Mancubus head-on, using the chaingun to "painstate" the second one significantly eases the start. This allows for a quicker exit and conserves precious health and ammo.

Map 04: Navigating the Cacodemon's Lair

Map 04 presents a unique challenge. Zero-Master explains a crucial maneuver: moving backward off the starting platform to avoid agitating a Cacodemon that's positioned in an acid pit. This Cacodemon needs to be dealt with if it teleports out, so avoiding unnecessary engagement here is key. Precision is paramount to hitting the switch without being caught off guard by stray fire.

Map 07: The Arachnotron Enigma

Some levels, like Map 07, offer less defined strats due to enemy unpredictability. Zero-Master admits to not having a solid plan for the Arachnotrons after crossing a gap, highlighting the inherent risk and reliance on adaptation in speedrunning.

Map 10: Arming Up for Survival

Map 10 is particularly dangerous because the armor acquired here is vital for Map 12. The strategy involves clearing out some Chaingunners and executing a quick linedef skip on the Revenant closet. The tension is palpable as the runner hopes to avoid Cacodemon fire while securing essential gear.

The need for that armor in Map 10 makes it a high-stakes gamble. One bad hit and the entire run could be compromised before you even reach the next critical stage.

Map 16: A Near-Disastrous Start

The start of Map 16 was, by Zero-Master's own admission, "a real mess." Uncertainty about the number and position of Shotgunners led to a near-fatal encounter when going for a linedef skip. Surviving that initial onslaught was a testament to quick reflexes and a bit of luck.

Map 18: Calculated Risks and Hitscanner Havoc

Map 18 offered a suboptimal start, with Zero-Master preferring to get a Shotgunner to teleport in first for potential infighting with an Imp. The close call came from an Imp while trying to dodge hitscanner fire. Failing to secure the MegaSphere here would have been fatal. The exit Arch-Vile jump, however, proved relatively straightforward.

Map 20: Baron of Hell's Unfortunate Positioning

In Map 20, the second Baron of Hell's movement out of a corridor took an agonizingly long time. Coupled with their unfavorable positioning, Zero-Master had to rely on sheer health reserves to survive. This map exemplifies how enemy AI and placement can drastically impact a run.

Map 22: The Linedef Skip and Spectre Scares

A different setup for the linedef skip on the red key trap, believed to be by JCD, made things a bit easier. However, the yellow key section poses a significant threat. Getting blocked by Spectres on the lowering bridge is a potential disaster, likely leading to a run-ending death.

Map 23: Navigating the 50/50 and BFG Drops

Map 23 has historically been a struggle, often described as a "50/50" level. Recent routing changes, possibly by S6kana, have significantly improved the approach. Starting by grabbing the blue key first (thanks to health from Map 22) is a major advantage. Dropping onto the platform near the yellow key switch with the BFG and executing a glide after clearing monsters near the red key gap are now key strategies for conserving health.

The routing improvements on Map 23 are a perfect example of how the speedrunning community constantly innovates, turning nightmare maps into manageable challenges through clever optimization and shared knowledge.

Map 24: The Arch-Vile Jump Gambit

Map 24 is relatively simple if the Arch-Vile jump is executed correctly. The main risk? Expecting the Arch-Vile to hit you, only for it to be killed by something else, causing the jump to fail. An alternative involves activating the bridge, but this allows the Arch-Vile to advance, potentially causing problems later.

Map 25: Megasphere Mania

Despite heavy initial damage, the plan for Map 25 was always clear: grab the MegaSphere and clear the room swiftly. The rocket jump required is considered easy, making this a relatively smooth segment if executed correctly.

Map 26: Pain Elemental Peril

Zero-Master expresses surprise at nearly dying to Pain Elementals on Map 26, despite having sufficient health. This serves as a stark reminder that even with a health advantage, the sheer number and threat of enemies on Nightmare! difficulty can be overwhelming.

It's moments like these on Map 26 that truly highlight the pressure of a speedrun. Even with a comfortable health buffer, the relentless assault can create unexpected peril.

Map 30: The Cyberdemon Showdown

The final map, Map 30, often involves strategies to weaken the Cyberdemon before engaging it directly. The idea is to prevent it from having a window to respawn after being damaged from below. This final encounter demands precision and a deep understanding of enemy behavior.

The Legacy of the Run and Future Potential

Zero-Master's run is more than just a time on a screen; it's a testament to the enduring appeal of Doom and the incredible dedication of its speedrunning community. The fact that this run was achieved with Crispy Doom, a modern-source port, shows how far gaming technology and technique have evolved.

When asked about how low the time could go, Zero-Master admits, "No idea." This leaves the door wide open for future attempts and innovations. Could we see this time drop even further? With the Plutonia WAD's notorious difficulty, any further improvement will require near-perfect execution and potentially groundbreaking new strategies. It's exciting to think about what the future holds for this classic map set.

For those interested in cooperative runs, Zero-Master mentions that JCD and S6kana might attempt a co-op playthrough on Nightmare!. You can find their previous Nightmare! record and UV co-op record on S6kana's YouTube channel.

The pursuit of perfection in speedrunning never truly ends. Each record broken simply sets a new benchmark, inspiring the next generation of players to push the limits.

Frequently Asked Questions

Q1: What makes The Plutonia Experiment so difficult on Nightmare! difficulty?
A1: Nightmare! difficulty significantly increases enemy damage, speed, and aggression, while also restricting saves. Plutonia itself features extremely challenging map design, traps, and enemy placements, making it one of the hardest official Doom WADs.

Q2: What is a "linedef skip" in Doom speedrunning?
A2: A linedef skip is a glitch or exploit where a player manipulates game physics or triggers to bypass a section of a map by passing through a specific trigger line (linedef) that wasn't intended to be crossed in that manner.

Q3: Why is the armor in Map 10 so important?
A3: The armor acquired in Map 10 is crucial for surviving the increased damage output from enemies in subsequent maps, particularly Map 12, which is known for its intense combat scenarios. Having that extra protection is vital for maintaining run viability.

Q4: Can this run be replicated on other source ports?
A4: While the core strategies are transferable, specific glitches and exploits like linedef skips can sometimes behave differently or be impossible in different source ports due to variations in engine emulation. Crispy Doom is known for its compatibility and faithfulness to original Doom behavior.

This incredible speedrun by Zero-Master is a milestone for Final Doom: The Plutonia Experiment. It showcases the pinnacle of skill, dedication, and strategic thinking in the gaming world. We encourage you to watch the run, study the strats, and maybe even try to beat your own personal bests! What are your thoughts on this record-breaking run? Did any specific map strategy surprise you? Let us know in the comments below or join the discussion on our GamingSpeedrun Discord server!

``` ```json { "@context": "https://schema.org", "@type": "FAQPage", "mainEntity": [ { "@type": "Question", "name": "What makes The Plutonia Experiment so difficult on Nightmare! difficulty?", "acceptedAnswer": { "@type": "Answer", "text": "Nightmare! difficulty significantly increases enemy damage, speed, and aggression, while also restricting saves. Plutonia itself features extremely challenging map design, traps, and enemy placements, making it one of the hardest official Doom WADs." } }, { "@type": "Question", "name": "What is a \"linedef skip\" in Doom speedrunning?", "acceptedAnswer": { "@type": "Answer", "text": "A linedef skip is a glitch or exploit where a player manipulates game physics or triggers to bypass a section of a map by passing through a specific trigger line (linedef) that wasn't intended to be crossed in that manner." } }, { "@type": "Question", "name": "Why is the armor in Map 10 so important?", "acceptedAnswer": { "@type": "Answer", "text": "The armor acquired in Map 10 is crucial for surviving the increased damage output from enemies in subsequent maps, particularly Map 12, which is known for its intense combat scenarios. Having that extra protection is vital for maintaining run viability." } }, { "@type": "Question", "name": "Can this run be replicated on other source ports?", "acceptedAnswer": { "@type": "Answer", "text": "While the core strategies are transferable, specific glitches and exploits like linedef skips can sometimes behave differently or be impossible in different source ports due to variations in engine emulation. Crispy Doom is known for its compatibility and faithfulness to original Doom behavior." } } ] }

Donkey Kong 64 WR Progression: A Deep Dive into the Ultimate Speedrunning Journey

Introduction

Welcome, speedrunning enthusiasts, to GamingSpeedrun.com! If you're here, you likely have a deep appreciation for the thrill of shaving milliseconds off a run, optimizing every jump, and pushing the boundaries of what's possible in our favorite games. Today, we're diving deep into the vibrant and often chaotic world of Donkey Kong 64 speedrunning. This N64 classic, beloved by many for its massive world and collection mechanics, presents a unique and demanding challenge for runners aiming for the top spot. Prepare yourselves, because we're about to explore the intricate strategies, the nail-biting races for the World Record (WR), and the incredible community that keeps this run alive and evolving.

The Early Days of Donkey Kong 64 Speedrunning

When Donkey Kong 64 first hit the scene, the concept of speedrunning it was as daunting as collecting all 500 Golden Bananas. The game's sheer size and the number of collectibles required felt antithetical to the typical speedrun philosophy. Early runners, armed with little more than determination and sheer grit, began dissecting the game's mechanics. Initial attempts focused on simply completing the game as fast as possible, often without much optimization. Think long, unskippable cutscenes and backtracking that would make most speedrunners weep. It was a testament to the dedication of the early #speedrunning community that they even tackled such a behemoth.

Back then, the idea of precise movement and routing was rudimentary. Runners were still discovering the nuances of the game's engine. The focus was less on advanced glitches and more on understanding the core pathing and how to chain actions efficiently. This foundational work, though primitive by today's standards, laid the groundwork for everything that was to come. It was a time of exploration, where every discovery felt monumental.

Key Strats and Skips: Mastering the Kongs

What truly elevates Donkey Kong 64 speedruns to an art form are the ingenious strats and glitches that runners have developed and refined over the years. The game's engine, while robust, has its quirks, and the speedrunning community has exploited them to perfection. Some of the most critical elements include:

  • Movement Tech: Mastering advanced movement like dive cancels, bunny hops, and ground pounds are essential. These techniques allow runners to maintain momentum and traverse the vast levels much faster than intended.
  • Glitches and Skips: Over the years, runners have found ways to skip entire sections of levels or even entire levels altogether. Techniques like wall clips, out-of-bounds maneuvers, and precise RNG manipulation for specific enemy patterns or item drops are crucial for top-tier runs. For example, performing a perfectly timed jump through a seemingly solid wall can save minutes.
  • Character Swapping Strategies: With five playable Kongs, each with unique abilities, efficient character swapping is paramount. Runners have developed intricate routes that minimize time spent switching characters and maximize the use of each Kong's specific skills for progression.
  • Boss Strategies: Even boss fights, which can be time sinks, have been optimized. Runners utilize specific weapon combinations and movement patterns to defeat bosses in mere seconds.
The development of the 'blueprint skip' was a game-changer, allowing runners to bypass a significant chunk of gameplay by clipping through a specific wall. This kind of deep-level understanding is what DK64 speedrunning is all about.

Each Kong – Donkey, Diddy, Lanky, Tiny, and Chunky – offers unique challenges and opportunities. Optimizing the order in which you tackle objectives and collect necessary items for each Kong is a puzzle in itself. Mastering these strats requires thousands of hours of practice and an intimate knowledge of the game's code.

Categories and Leaderboards: A Competitive Landscape

Like most major speedrunning titles, Donkey Kong 64 boasts several distinct categories, each catering to a different challenge and playstyle. The most prominent include:

  • Any%: This is the most popular category, where the primary goal is to finish the game as quickly as possible, using any glitches or exploits allowed.
  • 101%: This category requires players to collect 101% of the game's collectibles, involving a much more thorough playthrough and significantly longer run times.
  • 50/50% (or similar variants): These categories often focus on collecting specific subsets of items or completing certain objectives, offering alternative challenges for dedicated runners.

The leaderboard for Donkey Kong 64 on sites like speedrun.com is a testament to the ongoing competition. Watching the #WR change hands, sometimes by fractions of a second, is incredibly exciting. The top runners are constantly pushing each other, refining strats, and discovering new optimizations. The progression of the World Record is a story in itself, showcasing the dedication and innovation within the #speedrun community.

The race for the Any% WR in Donkey Kong 64 has seen some of the most intense back-and-forth battles in speedrunning history. Every frame counts.

Understanding the different categories is key to appreciating the full scope of the Donkey Kong 64 speedrunning scene. What might seem like a minor difference in requirements can lead to vastly different routes and strategies.

The Evolution of the WR

The journey of the Donkey Kong 64 WR is a fascinating narrative of discovery. In its early days, runs were significantly longer, often exceeding the 3-hour mark for categories like 101%. As the community grew and tools like save states for practice became more accessible (though not used in official runs), and as runners collaborated and shared knowledge, times began to tumble.

Key breakthroughs often involved the discovery of new glitches or the refinement of existing ones. For instance, the implementation of more advanced movement techniques allowed runners to skip sections that were previously considered mandatory. The video you're watching likely captures a specific era of this evolution, showcasing the strats that were cutting-edge at the time of its publication. Many runners have posted their personal bests (#PB) and celebrated their #WR achievements, only to see them surpassed months or even weeks later.

I remember when the Any% WR first broke the 1 hour and 40-minute barrier. It felt monumental at the time, a sign of how much optimization was still possible.

The continuous refinement of the route, understanding of enemy RNG, and execution of complex tricks means that the WR is always under threat. This constant evolution is what keeps the Donkey Kong 64 speedrunning community so engaged and passionate.

Community and Resources

The speedrunning of any game, especially one as complex as Donkey Kong 64, thrives on its community. Resources like dedicated Discord servers, forums, and streaming platforms (like Twitch) are vital hubs for runners. Here, they can:

  • Share new discoveries and strategies.
  • Ask for advice and receive feedback on their runs.
  • Organize races and community events.
  • Collaborate on research and glitch hunting.

The links provided in the original post, such as the music credits and Patreon supporters, highlight the collaborative nature of these productions. Content creators like Summoning Salt often produce high-quality documentaries that not only showcase the WR progression but also celebrate the individuals and the community behind it. Supporting these creators through platforms like Patreon ensures that more incredible content like this can be produced.

If you're serious about getting into Donkey Kong 64 speedrunning, connecting with the community is your first step. You'll find a welcoming group eager to help newcomers learn the ropes, from basic movement to the most complex, frame-perfect tricks. Joining the official Donkey Kong 64 speedrunning Discord is highly recommended.

FAQ

What is the current World Record for Donkey Kong 64 Any%?

The World Record is constantly being updated. For the most current time, please refer to the official leaderboards on speedrun.com.

Are glitches allowed in Donkey Kong 64 speedruns?

Yes, in most major categories like Any%, glitches and exploits are not only allowed but are essential for achieving top times. Specific categories might have different rulesets.

How long does a typical Donkey Kong 64 speedrun take?

For the Any% category, top runs are currently under 1 hour and 30 minutes. For categories like 101%, runs can exceed 2 hours.

What are the main challenges in Donkey Kong 64 speedrunning?

The main challenges include the game's massive size, the need for precise execution of complex movement and glitches, efficient character management, and dealing with the game's Random Number Generator (RNG) for certain events.

Where can I find tutorials for Donkey Kong 64 speedruns?

The best resources are the dedicated Donkey Kong 64 speedrunning communities on Discord and platforms like YouTube, where runners often post detailed guides and tutorials.

This has been a deep dive into the incredible world of Donkey Kong 64 speedrunning. From its N64 origins to the hyper-optimized runs of today, the game continues to captivate a dedicated community. The constant pursuit of the World Record, the discovery of new strats, and the shared passion among runners make this one of the most exciting speedrun communities out there. Keep practicing, keep pushing those limits, and maybe one day you'll see your name on that leaderboard!

What are your favorite Donkey Kong 64 speedrunning moments? Did you discover any new strats after reading this? Let us know in the comments below or join the discussion on our Discord channel! We love hearing from you.

```

HUNTDOWN SPEEDRUN WR - NORMAL DIFFICULTY: A Masterclass in 54:22.76!

Alright, fellow speedrunners and gaming enthusiasts! Get ready to witness pure gaming mastery. For three grueling months, countless hours were poured into perfecting the art of HUNTDOWN. While there were previous attempts with faster potential, the ultimate goal was a flawless run – zero deaths. And today, that goal has been achieved. Welcome to GamingSpeedrun.com, your ultimate hub for all things speedrunning!

Introduction: The Quest for Perfection

You're watching a new world record in HUNTDOWN, set on Normal difficulty with a staggering time of 54:22.76. This isn't just about speed; it's about precision, execution, and an unwavering commitment to a deathless run. In my experience, achieving a clean run, free of any mistakes, adds a layer of satisfaction that even a faster, but flawed, attempt can't match. This record is the culmination of months of dedicated practice, strategic planning, and overcoming the inevitable challenges that speedrunning presents.

HUNTDOWN WR Breakdown: 54:22.76 on Normal

Let's dive into what makes this run, published on August 30, 2021, a landmark achievement. The Normal difficulty in HUNTDOWN presents a unique set of challenges, balancing enemy aggression with environmental hazards. Achieving a time under 55 minutes is already impressive, but doing so without a single death elevates it to a new level of skill.

This wasn't just about memorizing enemy patterns or level layouts. It involved understanding the game's engine, identifying subtle gaming mechanics that could be exploited, and executing complex maneuvers with split-second timing. Every second shaved off is a testament to the runner's deep understanding of HUNTDOWN.

The 'No Death' Philosophy: Why It Matters

In the world of speedruns, different categories cater to various player preferences. While Any% runs often prioritize raw speed, pushing boundaries with glitches and skips, categories like 0-Death or Glitchless add significant difficulty and demand a different kind of mastery. This specific WR falls into the latter, showcasing an immaculate performance.

The beauty of a deathless run isn't just the lack of failure; it's the demonstration of absolute control and mastery over the game's systems.

Why is a 0-death run so significant? It means the runner didn't rely on risky maneuvers that could lead to failure. Instead, they opted for safer, albeit sometimes slower, strats that guaranteed progression. This approach often requires more intricate planning and a deeper understanding of enemy AI and projectile trajectories. It's a true test of nerve and skill, especially in a game as dynamic as HUNTDOWN.

Strat Deep Dive: Key Skips and Glitches

While the runner aimed for a clean run, exploiting certain game mechanics is still crucial for achieving top-tier times. We're talking about subtle skips that save precious seconds or clever use of environmental interactions. For instance, in the Industrial Zone, there's a known sequence break that bypasses a large enemy encounter if executed perfectly. This involves a precise jump-cancel followed by a well-timed dash.

Another key area is managing the boss encounters. Each boss has specific weak points and attack patterns. The PB here likely involved exploiting these patterns to their fullest, minimizing damage taken and maximizing damage output. Understanding the game's frame data and animation cancels can also be game-changing, allowing players to perform actions faster than intended.

Every pixel matters. In a run this tight, a single misplaced step can mean the difference between a record and a reset.

Identifying potential glitches or sequence breaks that don't compromise the 0-death rule is part of the advanced strategy. These might include wall clips that bypass small sections or AI manipulation to group enemies for efficient clearing. However, the primary focus remains on consistency and avoiding any situation that could lead to a premature game over.

RNG Management: Taming the Chaos

Every speedrunner knows the pain and triumph of Random Number Generation (RNG). In HUNTDOWN, RNG plays a significant role in enemy spawns, item drops, and even certain environmental events. A truly world-class run isn't just about executing strats; it's about adapting to the RNG.

For this 0-death run, the runner likely had to adapt their pathing based on enemy placements. If a particularly dangerous enemy spawns in a critical choke point, a runner might need to employ a different, safer route. Similarly, the availability of health packs or ammo can be RNG-dependent. Successful runners have backup plans for unfavorable RNG, ensuring they can still maintain momentum and avoid damage.

Studying the streaming VODs or recorded runs can reveal how the runner navigated these random elements. Did they reset on a bad spawn? Or did they power through with expert evasive maneuvers? This run suggests a strong ability to adapt and overcome.

Community Support and Getting Involved

Achieving a world record like this is a personal triumph, but it also contributes to the broader speedrunning community. Platforms like Speedrun.com are where these achievements are officially tracked and verified. Engaging with the community, sharing strategies, and offering support are vital parts of the culture.

If you're inspired by this run and want to dive deeper into HUNTDOWN or other games, consider joining our Discord channel. It's a space where passionate gamers share tips, discuss strats, and organize community events. Your support, whether through engagement or by checking out our exclusive merchandise, helps keep the passion for hardcore gaming alive.

Frequently Asked Questions

What is the difference between Any% and 0-Death runs in HUNTDOWN?

Any% runs aim to finish the game as quickly as possible, often utilizing glitches and skips. 0-Death runs, on the other hand, prioritize completing the game without dying at all, which may involve different, safer strategies and potentially a longer time.

How long did it take to achieve this specific World Record?

The runner mentioned that this specific record was the culmination of approximately three months of dedicated work, involving extensive practice and refinement of strategies.

Are there specific glitches used in this 0-Death WR?

While the primary focus was on a deathless run, advanced runners often incorporate minor sequence breaks or exploits that don't risk a death to save time. The exact strats are usually detailed in run commentaries or community discussions.

Where can I find more HUNTDOWN speedruns?

The best place to find verified speedruns, leaderboards, and discussions for HUNTDOWN is on its dedicated page at Speedrun.com.

Conclusion: A New Benchmark for HUNTDOWN

This 54:22.76 world record in HUNTDOWN's Normal difficulty is more than just a number; it's a statement. It signifies a deep understanding of the game, impeccable execution, and the mental fortitude to achieve perfection under pressure. It sets a new benchmark for what's possible and will undoubtedly inspire countless other runners to push their limits.

What did you think of this incredible run? Did any particular strategy stand out to you? Share your thoughts in the comments below! Join our Discord community to discuss this and other amazing speedruns, and consider supporting our work by visiting our store. Happy gaming, and may your own runs be swift and flawless!

Duke Nukem 3D Max% Speedrun: 1:05:43.54 World Record Breakdown

What up, fellow runners and Duke enthusiasts! You've clicked on this post because you want to know the nitty-gritty behind a blistering speedrun of Duke Nukem 3D, specifically the incredibly demanding Max% category. This isn't just about blasting through levels; it's about precision, routing, and pushing the game to its absolute limits. Today, we're diving deep into the 1:05:43.54 World Record (WR) for Episodes 1-3, a run that redefined what's possible.

What Exactly is Max% in Duke Nukem 3D?

Let's get one thing straight: Max% in Duke Nukem 3D is no joke. This category demands absolute completionism. What does that mean in practice? It means you *must* kill every single enemy that spawns on a map and find every single secret, including any secret levels that might be tucked away. For those unfamiliar, "spawning" enemies often involves specific triggers or interactions – it's not just about enemies that are visually present from the start. This includes the sometimes controversial "babes" that trigger enemy reinforcements. It’s a true test of mastery over the game's mechanics and level design. This category requires a deep understanding of gaming intricacies.

Breaking Down the 1:05:43.54 WR Run

This 1:05:43.54 World Record for Episodes 1-3 on Max% is a testament to countless hours of practice, meticulous planning, and sheer execution. It involves a completely rerouted path through most maps. The runner, in this case, significantly optimized movement and combat sequences to shave off precious seconds. Every jump, every shot, every use of the steroids power-up is calculated. Even seemingly minor optimizations, like a slightly faster reload animation or a more efficient weapon switch, add up over the course of 16 maps. This level of detail is what separates a good run from a WR.
"The core of this run is about leaving no stone unturned, literally and figuratively. Every enemy defeated, every secret found, brings you closer to that perfect Max% completion."
The category itself is inherently challenging due to the need to trigger all enemy spawns. This often means interacting with specific environmental objects or even specific non-hostile characters within the game world, making the route planning even more complex than a standard Any% speedrun.

Routing and Strategy: Beyond the Basics

The strategies employed in a top-tier Duke Nukem 3D Max% run go far beyond simply knowing where the exit is. This WR represents a significant evolution in routing. The runner likely identified optimizations in enemy engagement, minimizing backtrack, and maximizing the use of power-ups like the almighty steroids. * **Enemy Engagement**: Instead of clearing enemies as they are encountered, the optimal strategy involves triggering enemy spawns in an order that allows for efficient clearing. This might mean luring enemies into kill zones or using weapon properties to hit multiple targets at once. * **Secret Hunting**: Finding all secrets requires intimate knowledge of each map's layout and potential hidden areas. Often, these secrets are behind destructible walls or require specific actions to unlock, demanding precise timing and positioning. * **Steroid Management**: The steroids power-up is crucial for speed. Efficiently picking up and utilizing steroids at key moments—during combat sequences or long traversal sections—can save significant time. The original text mentions "unused steroids," indicating that even in this WR, there was room for improvement in resource management.

The Quirks of Enemy Counting and Unspawnable Foes

One of the most fascinating and frustrating aspects of Duke Nukem 3D speedrunning, especially in Max%, are the quirks within the game's engine. The original post touches on this: "Sometimes the ingame counter gets bugged like I kill more than the maximum." This happens occasionally, where the game's internal counter for killed enemies might glitch, either by overcounting or undercounting. A more persistent issue mentioned is on the "Overlord" level, where "there is an unspawnable enemy." This means that, due to the map's design or scripting, one specific enemy might not be programmed to appear or be triggerable, making a true 100% enemy kill count technically impossible in certain runs. Speedrunners often have to accept these engine limitations and focus on achieving the highest *possible* completion percentage. These are the kinds of deep-dive issues that the gaming community loves to uncover.

The Road to Sub-1 Hour: Is It Possible?

The mention of sub-1 hour being possible is the holy grail for many Duke Nukem 3D Max% runners. The original post states: "I believe sub1 hour is possible." This belief stems from the identified optimizations: * **Grind and RNG**: "with enough grind and good rng". Grinding refers to the repetitive practice required to perfect difficult segments. RNG (Random Number Generation) plays a role in enemy placement, item drops, and other unpredictable elements. A favorable RNG can shave seconds, while bad RNG can cost minutes. * **Further Routing**: There's always room to refine routes. Discovering new skip strategies, more efficient combat patterns, or better understanding of enemy AI can lead to faster times. * **Steroid Optimization**: As noted, even this WR run had unused steroids. Finding ways to incorporate more steroid usage without compromising other objectives is a key area for improvement. Pushing for sub-1 hour requires near-perfect execution across all 16 maps, minimal mistakes, and a significant amount of luck with RNG. It's the ultimate challenge in this category.

My Personal Take: The Grind and RNG

As a seasoned speedrunner myself, I can attest to the brutal nature of pursuing a Max% category, especially in a classic like Duke Nukem 3D. The requirement to find every secret and kill every enemy means that a single missed secret or an enemy that proves elusive can cost you the entire run, forcing a reset. The grind is real. You'll play the same levels hundreds, if not thousands, of times. The RNG element can be both a blessing and a curse. Seeing that perfect enemy spawn pattern or finding that crucial health pack exactly when you need it feels incredible. Conversely, dealing with an unfavorable RNG can be soul-crushing, making you question why you even started. However, it's this blend of perfected skill and the thrill of the unknown that makes speedrunning so addictive. The feeling when all the pieces click together, and you nail a difficult strat you've been practicing for weeks? Unbeatable. This is the true spirit of gamer dedication.
"The grind teaches you patience, and the RNG teaches you adaptability. Both are essential for any serious speedrunner."

Conclusion: The Enduring Legacy of Duke Nukem 3D Speedrunning

Duke Nukem 3D continues to be a beloved title in the speedrunning community. Its aging but robust engine, combined with its iconic gameplay, provides a fertile ground for challenges like the Max% category. This 1:05:43.54 WR is not just a number; it's a milestone representing immense dedication and skill. It pushes the boundaries and inspires future runners to chase even greater achievements. Whether you're a seasoned runner aiming for your next PB or a newcomer curious about the genre, Duke Nukem 3D offers a compelling and rewarding speedrunning experience. Keep practicing, keep experimenting, and maybe, just maybe, you'll be the one to break that sub-1 hour barrier! This dedication showcases the best of PC gaming.

Frequently Asked Questions

**Q1: What is the difference between Any% and Max% in Duke Nukem 3D speedruns?** A1: Any% focuses on reaching the end of the game as fast as possible, often skipping most enemies and secrets. Max% requires killing all enemies and finding all secrets on every map, making it significantly longer and more difficult. **Q2: Is Duke Nukem 3D still popular for speedrunning?** A2: Absolutely! Duke Nukem 3D remains a classic in the speedrunning community, with active runners competing in various categories, including Any%, Max%, and specific episode runs. **Q3: What is RNG in the context of speedrunning?** A3: RNG stands for Random Number Generation. It refers to unpredictable elements within a game, such as enemy placement, item drops, or AI behavior, which can significantly impact a speedrun time. **Q4: How hard is it to achieve a World Record in Duke Nukem 3D?** A4: Achieving a World Record requires an extremely high level of skill, deep game knowledge, meticulous routing, consistent execution, and often, favorable RNG. It represents the pinnacle of dedication in the speedrunning community for that specific category.

Mastering the Toughest Pokémon Challenge: My Journey to Victory

Hey there, fellow gamers and speedrunners! Ever stared down a challenge so daunting it felt like an insurmountable wall? I'm talking about those moments in gaming where the difficulty spikes, the odds are stacked against you, and only sheer determination and a bit of savvy can see you through. Today, I want to share my epic journey through what I genuinely believe is the hardest Pokémon game ever made. This isn't just about beating it; it's about mastering its brutal mechanics, outsmarting its relentless challenges, and emerging victorious.

Introduction: The Gauntlet Begins

The world of Pokémon is vast, filled with countless adventures. But some games, or rather, some *versions* of Pokémon challenges, push the boundaries of what we consider difficult. We're talking about the infamous Nuzlocke runs, where every fainted Pokémon is permanently lost, and sometimes, where even the player character can "black out" and lose the run entirely. This particular challenge, in my experience, took those Nuzlocke rules and amplified them to an almost absurd degree. The journey was grueling, filled with moments of despair and elation, and required a level of strategic depth I hadn't anticipated.
This wasn't just about leveling up; it was a high-stakes chess match against the game's AI and its unforgiving mechanics.
My goal was to conquer this brutal Pokémon gauntlet, not just to finish, but to do so with a level of efficiency that borders on speedrunning. Every decision mattered, every encounter was a potential run-ender, and every bit of good fortune was a blessing.

Chapter 1: Turbulence - The Early Struggle

The initial stages of any challenging Pokémon run are crucial. This is where you establish your core team, scout for essential encounters, and begin to understand the game's rhythm. In this specific challenge, the early game felt like navigating a minefield. Random encounters could quickly decimate your starter Pokémon or the few early-game catches you managed to get. The limited resources and the constant threat of permadeath meant that every wild battle was a calculated risk. I had to meticulously plan my routes, considering the potential Pokémon encounters and the trainers I absolutely *had* to battle, while avoiding those that posed too great a risk.

Chapter 2: Flight Of The Phoenix - Rising from the Ashes

There were moments, more than I care to admit, where I thought the run was over. A critical hit from an unexpected rival, a poorly chosen move against a gym leader, or even just bad luck with stat drops could send you spiraling. But that's the beauty of these hardcore challenges – they force you to adapt. When a key Pokémon fainted, I couldn't just replace it. I had to re-evaluate my entire team composition, my strategy, and sometimes, my entire approach to the next segment. This phase was all about resilience, picking yourself up after setbacks, and finding new paths to victory.

Chapter 3: And Make It Double - Doubling Down on Strategy

As the game progressed, simple brute force was no longer an option. I had to start thinking about synergistic team compositions. This meant considering type matchups not just for one battle, but for an entire sequence of gym leaders and E4 members. It involved understanding move sets, abilities, and even held items in ways I hadn't before. For instance, pairing a Pokémon with an ability that boosts offense with another that can guarantee a switch-in safely became paramount. Doubling down on strategy wasn't just about picking the "best" Pokémon; it was about crafting a cohesive unit that could cover each other's weaknesses and exploit every enemy's vulnerability.

Chapter 4: A World On Fire. And Water.

This section of the game presented unique environmental and type-based challenges. Navigating areas dominated by Fire or Water-type Pokémon required a specific team composition and careful planning. One wrong move could lead to a cascade of super-effective hits. I remember spending hours theorycrafting the perfect counter-team for a particularly notorious gym leader, experimenting with different Pokémon available in the wild and even considering sacrificing certain encounters to preserve others. The "and there's also Water" part was a constant reminder that even when you think you've prepared for one element, another is always lurking.
The sheer variety of threats meant that a one-size-fits-all approach was a recipe for disaster.

Chapter 5: Around The World In 15 Encounters

This segment really tested my patience and my ability to manage encounters efficiently. The goal here wasn't just about reaching the destination, but doing so with minimal, high-quality encounters. Every wild battle risked precious PP, HP, and potentially, the life of a team member. This called for an aggressive use of repel strategies, precise movement to avoid unnecessary encounters, and quick decision-making when battles were unavoidable. It was a race against the clock, but also a race against the game's random encounter table.

Chapter 6: The Hoenn Bomb Scare

The title of this chapter is a bit of a playful nod to the intense pressure I felt during this phase. It felt like every trainer battle was a "bomb" waiting to explode in my face. The difficulty ramped up significantly, and the trainers' teams were much more specialized and dangerous. This was where my earlier strategic planning truly paid off. I had to utilize my carefully curated team, employing specific Pokémon for specific threats, and executing battle plans with precision. It was a true test of whether my preparation was sufficient.

Chapter 7: Berserker - Unleashing Fury

By this point, the game was throwing everything it had at me. The "Berserker" phase was characterized by relentless aggression from the AI. My strategy shifted from pure defense to calculated offense. It was time to unleash the full power of my team, exploiting every advantage and maximizing damage output. This meant identifying the perfect moments to use powerful moves, ensuring my sweepers were healthy and ready to go, and sometimes, taking calculated risks to end battles quickly and decisively.

Chapter 8: A Sisyphian Tale - The Final Push

The final stretch of any difficult game is often the most demoralizing. The "Sisyphian Tale" perfectly captures this feeling – the endless struggle towards the summit, with the constant fear of rolling back down. The Elite Four and the Champion are the ultimate bosses, and in this challenge, they were absolutely brutal. Each member required a distinct strategy, and a single mistake could cost you the entire run. This was the culmination of all the planning, all the grinding, and all the resilience. It was the final test of my mastery.

Key Strategies and Mindset

To conquer a game this difficult, a solid strategy and the right mindset are non-negotiable. * **Team Synergy is King**: Don't just pick strong Pokémon. Pick Pokémon that work well *together*. A balanced team with good type coverage, complementary abilities, and varied move sets is essential. * **Know Your Enemy**: Study trainer teams, gym leader lineups, and potential wild encounters. Knowledge is your greatest weapon. * **Resource Management**: Conserve items, PP, and your Pokémon's HP whenever possible. Every resource is precious. * **Calculated Risks**: Sometimes, you have to take a risk. But ensure it's a *calculated* risk, where you've weighed the potential rewards against the dangers. * **Adaptability**: Things will go wrong. Your star Pokémon might faint. You need to be able to pivot, re-strategize, and adapt on the fly. * **Mental Fortitude**: This is perhaps the most important. You will fail. You will get frustrated. But you must persevere. A positive and determined mindset is key to overcoming these extreme challenges.

RNG Management: Taming the Beast

Random Number Generation (RNG) is the bane and the blessing of every Pokémon player. In a challenge like this, mastering RNG management is crucial. * **Critical Hits**: While you can't control them, you can build teams that can survive them or capitalize on them. Sometimes, you just have to pray for no critical hits on your key Pokémon. * **Stat Drops/Boosts**: Understand how moves like Intimidate or Leer work. Use them to your advantage or have Pokémon that are immune or resistant to their effects. * **Encounter Rates**: Learning which routes have specific Pokémon and using items like Repels to navigate efficiently saves time and prevents unwanted encounters. * **Status Conditions**: Being able to inflict or resist status conditions (paralysis, poison, sleep) can turn the tide of a battle.

Speedrun Considerations

While this run was about ultimate difficulty, the speedrunner in me couldn't help but think about efficiency. * **Optimal Routes**: Planning the fastest path through each area, minimizing backtracking and unnecessary battles. * **Fastest TMs/HMs**: Acquiring the most useful TMs and HMs as early as possible to speed up progression. * **Skip Strategies**: Identifying any glitches or skips that can save significant time, though in Nuzlockes, these are often avoided to maintain the challenge's integrity. * **Quick Battles**: Employing strategies that end battles as quickly as possible, minimizing the time spent in menus and animations.
Even in the hardest challenges, there's always a way to shave off precious seconds if you look hard enough.
This entire journey was a testament to the enduring appeal of Pokémon challenges. It pushed me to my limits and beyond, but the feeling of accomplishment was unparalleled. If you're looking for the ultimate test of your Pokémon mastery, I highly recommend diving into the deepest, hardest challenges the community has to offer.

Frequently Asked Questions

What makes this Pokémon game the "hardest"?

This typically refers to a specific ruleset, like a Nuzlocke with additional self-imposed restrictions (e.g., limited healing items, specific Pokémon bans, increased AI difficulty). It's about maximizing the challenge and the risk of failure.

How do you deal with permadeath in a Nuzlocke?

The core rule is that any Pokémon that faints is considered "dead" and must be permanently released or Boxed. This forces players to be extremely cautious and strategic.

Is it possible to speedrun a Nuzlocke?

Yes, but it's a very different kind of speedrun. The focus shifts from pure time-saving to efficient risk management and execution under extreme pressure, where one mistake can end the run.

What's the most important strategy for a difficult run?

Adaptability. While planning is crucial, you must be able to adjust your strategy on the fly when unexpected events occur, like losing a key team member.

Where can I find more hardcore Pokémon challenges?

Websites like speedrun.com, community forums, and dedicated YouTube channels and Twitch streams are great resources for discovering and learning about different challenge runs. Welcome to the extreme end of Pokémon gaming! If you’ve ever conquered a brutal challenge or have your own tips for surviving the toughest runs, share them in the comments below! Let’s build a community of hardcore trainers. Join our Discord channel to connect with fellow gamers and discuss your epic victories!

Blood Speedrun (Any% No Episode Warp): 13:26 - A Masterclass in Terror

Introduction: Welcome to the Undead Playground

Alright, fellow runners and fans of gaming history! You've stumbled upon a legendary run. This isn't just any speedrun; it's a meticulously crafted speedrun of Blood, specifically the Any% No Episode Warp category, clocking in at an astonishing 13 minutes and 26 seconds. This run, published back on April 26, 2021, represents a peak of skill, dedication, and a deep understanding of what was once a terrifying shooter. For those new to the game or the world of speedrunning, this category means beating the game as fast as possible without using any major warps between episodes. It's about pure, unadulterated progression through every blood-soaked level.

At GamingSpeedrun, we live and breathe this stuff. We aim to be the most complete and updated online gaming blog on the internet. Whether you're on PC, Playstation, or Xbox, if it's about pushing limits, you'll find it here.

The Any% No Episode Warp Stratagem

The Any% No Episode Warp category is king for a reason. It demands mastery over movement, combat, and an intimate knowledge of the map layouts. Unlike categories that might abuse major skips, this one relies on executing near-perfect sequences of actions to shave off every possible second. The goal is simple: reach the end credits via the fastest route possible, avoiding any intentional major game-breaking skips. This means a lot of precise combat and efficient traversal.

In my experience, perfecting the early game is crucial. Any time lost in the first few levels has a massive ripple effect. Getting the right weapon early and knowing exactly which enemies to engage and which to bypass is paramount. The 13:26 mark isn't just fast; it's a statement on how optimized this game can be.

Segment Breakdown: Navigating the Chaos

Breaking down a run like this requires looking at it in segments. Each level, each encounter, is a mini-challenge.

  • The Crypts: This initial area is all about establishing a fast pace. Acquiring the Sawed-Off Shotgun early is a priority. Learning the optimal path through the tight corridors and efficiently dispatching the initial waves of cultists and zombies sets the tone.
  • The Altar: Moving into this section, players need to be mindful of specific enemy placements. The infamous Stone Gargoyles can be a major time sink if not handled correctly. Quick movement and precise aiming are key here.
  • The Tunnels: This maze-like area often trips up runners. Knowing the exact sequence of turns and avoiding unnecessary backtracking is vital. Enemies here can quickly overwhelm if you're not constantly moving forward.
  • The Catacombs: Deeper into the game, the enemy variety increases. Efficiently dealing with Hellhounds and the dreaded Life Drainers requires specific strategies to avoid taking damage and losing precious seconds.
  • The Boss Encounters: While this category doesn't involve major boss skips, knowing the quickest way to trigger and defeat each boss is essential. Exploiting their attack patterns with the right weapons can save significant time.

Weapon Management: Every Bullet Counts

Blood isn't a game where you can just spray and pray, especially not in a speedrun. Every bullet, every shell, counts.

In runs like this, ammo conservation isn't just a suggestion; it's a fundamental pillar of the strategy. You can't afford to waste a single shot on an enemy that can be bypassed or taken down with less firepower.

The arsenal in Blood is varied, but for a speedrun, a few stand out:

  • Sawed-Off Shotgun: Your bread and butter for early game and close-quarters combat. Essential for clearing groups of weaker enemies quickly.
  • Tommy Gun: Excellent for sustained fire and dealing with tougher foes at medium range. Its high rate of fire can melt enemies if you have the ammo.
  • Dynamite/Bundle of dynamite: Perfect for clearing groups or dealing burst damage to tougher enemies and bosses. Precise placement is key.
  • Tesla Cannon: The ultimate room clearer, but often scarce in terms of ammo. Knowing when and where to use its devastating power is critical for saving time on specific encounters.

The runner must have an ingrained knowledge of weapon pickup locations and optimal usage. Sometimes, it's faster to run past an ammo pickup if you know you won't need it for the next segment.

Key Enemy Encounters and How to Overcome Them

Certain enemies in Blood are notorious time-killers if you're not prepared. A successful run hinges on knowing how to deal with them efficiently.

  • Cultists: The most common enemy, but their melee attacks can stagger you, costing precious time. A quick shotgun blast or burst from the Tommy Gun usually does the trick.
  • Zombies: Slow but can swarm. Generally ignorable if you maintain speed, but a threat in tight spaces.
  • Stone Gargoyles: These flying terrors can be a nightmare. Quick reflexes and accurate fire are needed to take them down before they inflict significant damage or block your path. Often, dodging their projectiles while advancing is more efficient than stopping to fight.
  • Hellhounds: Fast and dangerous. A well-timed blast from the shotgun or a few well-aimed shots from the Tommy Gun can dispatch them quickly.
  • Life Drainers: These ethereal enemies can drain your health from a distance. Prioritize taking them out with the Flare Gun or Tommy Gun whenever they pose a threat to your run.

The psychological aspect of speedrunning is huge. You're under immense pressure, and a single mistake can mean restarting. Staying calm and executing the strategy, even when things go wrong, is what separates good runs from great ones.

Advanced Techniques and Glitch Exploitation

While this category is "No Episode Warp," it doesn't mean glitches are entirely off the table. Certain minor exploits or sequence breaks might be utilized if they don't constitute a major "episode warp." This could include things like:

  • Wall Clipping (Minor): Small instances where precise movement can clip through certain geometry to bypass tiny obstacles or take shortcuts.
  • Enemy Manipulation: Luring enemies into specific positions to group them up for explosives or to make them miss attacks.
  • Jump/Strafe Techniques: Maximizing movement speed by utilizing specific jump and strafe combinations.

A runner at this level has likely spent hundreds, if not thousands, of hours discovering and perfecting these nuances. The specific stratagem used in this 13:26 run would detail every pixel-perfect jump and every frame-perfect weapon switch.

RNG Manipulation: The Silent Partner

In many speedruns, Random Number Generation (RNG) plays a significant role. This includes enemy spawns, item drops, and even critical hit chances. While this run doesn't rely on major RNG manipulation for skips, efficient play means minimizing the negative impact of bad RNG and capitalizing on good RNG.

For instance, the number of enemies that spawn in a particular area or the exact placement of a crucial pickup can vary. A top-tier runner has strategies to deal with the worst-case scenarios, ensuring that even slightly unfavorable RNG doesn't derail the entire run. This often involves having backup plans for specific enemy engagements or knowing alternative paths if a primary route is blocked by unexpected spawns.

The Final Push to a New World Record

Achieving a time like 13:26 in Blood Any% No Episode Warp is the culmination of relentless practice and strategic innovation. It represents shaving milliseconds off every movement, every shot, and every encounter. The runner behind this record likely dedicated an immense amount of time to practicing specific segments, developing new strats, and optimizing their execution.

This isn't just about beating the game; it's about beating the clock and pushing the boundaries of what's considered possible. It's a testament to the dedication found within the speedrunning community. This World Record (WR) stands as a benchmark for future attempts, inspiring others to train harder and discover even faster ways through the horrors of Blood.

Community Impact and Future of Blood Speedrunning

Runs like this are vital for the health of a game's speedrunning community. They generate excitement, attract new players, and provide valuable learning resources for those looking to improve their own times. The detailed strategies, the execution, and the sheer speed displayed in this 13:26 run become the new standard.

We encourage everyone interested in this incredible feat to dive deeper. Check out the original publication, analyze the runner's movements, and perhaps even consider submitting your own Personal Best (PB). The speedrunning community thrives on shared knowledge and friendly competition. The next great stratagem or glitch discovery could be just around the corner! Keep an eye on leaderboards and forums; the quest for the ultimate time never truly ends. This kind of gaming is what drives innovation and passion.

Frequently Asked Questions

Q1: What does "Any% No Episode Warp" mean in Blood speedrunning?
A1: It means completing the game as quickly as possible (Any% is the fastest possible completion) without using any major teleports or warps that skip significant portions of the game between distinct episodes. You must progress through the game's levels sequentially.

Q2: Is Blood a difficult game to speedrun?
A2: Yes, Blood can be quite challenging to speedrun due to its fast-paced combat, numerous enemy types that can inflict status effects or stuns, and intricate level design that requires precise movement and routing.

Q3: What are some of the most crucial elements for a successful Blood speedrun?
A3: Key elements include precise movement (strafe jumping, bunny hopping), efficient weapon management and targeting, knowledge of enemy behaviors and optimal takedown methods, and a route that minimizes backtracking and wasted time.

Q4: How much practice does it typically take to achieve a world record time like 13:26?
A4: Achieving a world record time often requires hundreds, if not thousands, of hours of dedicated practice. This includes mastering individual segments, learning precise execution for every action, and understanding how to handle different RNG outcomes.

This WR represents the pinnacle of Blood speedrunning in its category. What are your thoughts on this incredible run? Did you discover any new tricks watching it? Let us know in the comments below or join the discussion on our Discord channel!